Fire Building - Fire Craft
Fire building is an important core skill. It is critical to know how to start a fire. It isn’t enough to just know how to start a basic fire under optimal conditions. You need to be good at it. Starting a fire in the middle of the night, in the rain, can be difficult. You should also really be familiar with all of the different methods for doing this.
We’re going to cover all of these:
- Basic fire building concepts
- Types of fuel
- Storm matches vs lighters
- Flint and steel / ferro rods
- Friction with sticks - hand drill, etc.
- Transporting fire
Why Fire?
- Provides warmth
- Cooks food
- Purify water
- Sterilize bandages
- Signal for rescue
- Provide protection from animals
- Keep insects away
- Can help in the construction of tools and weapons
- Boost morale
- Conserve calories
- Dry clothing and boots
Why You Need Fire
Probably the most obvious reason why fire is important is because it provides warmth. It can keep you from freezing to death and either complement or supplement a good shelter. Cooking is the next most obvious reason to have a fire. Besides just being a way to make food taste better, many things require cooking. Raw meat from a recently killed animal will need to be cooked. So basically fire opens up more options for food. Raw meat becomes edible if you have fire.
The most critical reason you need to be able to build a fire is to purify water. To be fair this reason is probably tied with staying warm. Your specific situation will dictate which of these two is actually the most important. Fire provides a way to purify water, making it safe to drink. You can run out of water purification tablets but with a fire your purification method isn’t expendable. Water should be heated for about 5 minutes before it should be considered safe to drink. Obviously, let it cool down afterwards.
Fire helps with a lot of other things you may not have thought of. It can be used to sterilize bandages helping to prevent infection. It can also be used to signal for help. If you are lost somewhere and people are searching for you over a large area, there is a good chance that they might miss you. A fire will make spotting you a lot easier even from a distance. At night the light from the fire can be seen and during the day the smoke can be seen.
You probably won’t have to worry about animals directly harming you. It isn’t usually a huge risk. You are actually more likely to die from some other environmental hazard like cold, dehydration, or starvation. Building a fire is still a very effective way to make sure that animals stay away though. Any animals that could have been a threat will no longer be an issue. It will put your mind at ease so you can focus on other things. One huge advantage to having a fire is that it will keep insects away. Swarms of mosquitos and other insects can be more than just annoying.
A fire can be used to help in the construction of tools and weapons.
It is also a huge morale booster. You will feel a lot better having a fire. This will help to put you in a better state of mind. Falling asleep in a makeshift shelter while alone in the woods is much easier with a nice fire burning.
Conserving calories is important when you may not have a steady source of food. You don’t want to expend unnecessary energy. Using a fire to keep warm means that your body needs to burn fewer calories to keep your body temperature up. Eating cold food can chill the body requiring more calories to be expended. Being able to heat up your food will also conserve calories.
A fire will also give you a faster way to dry your clothing or boots. Keeping dry is important and having a fire to dry your cloths when they become wet can be a lifesaver.
Where to build It
Here are a few different factors to consider. A fire should be:
- Protected from the wind
- Away from anything that can burn
- Built in relation to your shelter
Wind is a big consideration when building a fire. It can make this especially difficult when you are trying to light your fire. You should still be able to get a fire going, even in heavy winds, if you do things right. If you can, you are going to want to select a campsite that is protected from the wind. This is also going to be the general area where you build your fire. Pick a spot where the wind is already partially blocked naturally, either by a hill or something else.
It is common to surround your firepit with rocks on all sides to block the wind and keep things contained.
You can further protect your fire from the wind by building a firewall with rocks or logs. This will reduce the wind if placed correctly. This also helps to redirect heat. You would place it so that it reflects heat back towards your shelter or towards where you would be sitting. It also helps to prevent flying sparks and embers from spreading.
When setting up a fire pit you will usually clear things away and possibly remove some dirt. It is common to dig at least a small depression where you plan to build your fire. Taking this effort a step further you may build what is referred to as a trench fire. This is basically a hole or trench to block the wind. Surrounding it with rocks helps. Gaps can optionally be filled with mud or clay but you will want to make sure that you have adequate airflow.
It is important to clear away anything that could burn or catch fire. Clear brush, leaves, and dry vegetation away to make sure the fire won’t spread. Keep in mind that you don’t want anything close enough that an ember or spark might land on it.
Don’t build a fire too close to trees or bushes. Watch out for overhanging branches that could catch fire. These can be easy to overlook.
You are going to want to locate your fire and your shelter relative to each other. You will want your fire to be built near where you plan to build your shelter. You don’t want it to be too close if your shelter is flammable. For example, if you are using a tent you will need to be extra careful. A flying ember could easily burn a hole through the side of your tent.
Some shelters are specifically designed to be build together with a firepit. You might combine a lean-to with a firewall. The wall would reflect additional heat from the fire back into your shelter. It is a big advantage to be able to concentrate heat in a desired direction.
- WARNING - Don’t use wet or porous rocks. Wet rocks can actually explode, especially if they are porous. This can easily happen if you use rocks from a river to build a fireplace.
- WARNING - in a shelter it can cause burns and carbon monoxide poisoning
Need to find fuel
Prepare a fire pit and gather all materials before you start.
- Tinder
- Kindling
- Small fuel
- Main fuel
- Large fuel
Ideally all fuel used should be dry. This is especially important for tinder and kindling. Dry standing wood is most likely to be fully dried. Anything touching the ground is more likely to be damp but still might be usable. Live wood is still going to contain some moisture and be less than ideal.
Tinder
To start a fire you will use a ball of tinder. This will be about the size of a grapefruit. It should be as fine as possible. How fine you need it to be will depend on what method you use to start it. Buffing may be necessary. The finer the consistency, the better. Tinder is essential and is usually required to start a fire. Exceptions would be when using a liquid accelerant or firestick.
Some materials can be lit very easily even with just a few sparks. These include cotton balls and dryer lint. Natural tinder is relatively easy to use with matches or a lighter but it can be very difficult to light with just sparks. If you are starting a fire using only sparks (ex. with a ferro rod) and you are using natural tinder it will take a little extra work. You will need to make sure that the consistency of your tinder is about the same as cotton wool. You will do this by buffing, as described below. It also needs to be absolutely dry.
Another alternative method for starting natural tinder is to use charred cloth. A spark can be caught in the charred cloth which will help to keep it alive and start the tinder.
Artificial Tinder:
- Cotton balls
- Dryer lint
- Bits of rope or cloth
Natural Tinder:
- moss - must be dry
- Fungus - inner flesh
- Bark - inner bark
- Rotten, dried out wood
- Dry grass - easy to buff
- Dry leaves - crumpled, whole, or buffed
Prepping Tinder
- Powdering - Trim bits of bark as fine as possible. This can be done with dried out rotted wood as well.
- Nicking - Cut a nick in the surface of something. For example, cut a notch in the surface of a dried out fungus and drop an ember inside This gives a large surface area to burn.
- Buffing - Rub or twist fibers to break them up with your fingers. You can use a rock too. Small sparks require tinder to be like cotton wool.
Kindling
This also needs to be dry. Kindling is added on top of the tinder. It should be bone dry. It should also be as small as possible. The sticks that you select should be no thicker than a pencil. Ideally you will want to start with even thinner sticks and work your way up to this. The idea is to use smaller sticks to get the heat up and create a more stable fire before adding larger fuel that doesn’t burn as easily.
Small Fuel
Once the kindling is burning well and you have established a steady flame, it is time to move on to small fuel. These are about the thickness of a finger. This will get you to a stable, fully burning fire that can be sustained. Once these are burning well you can move on to the main fuel.
Main fuel
This consists of bigger sticks. They will be larger than your finger. These can still be broken up and managed. These burn slowly and steadily and can be used once there is enough heat. These will keep a steady fire going for cooking and other purposes. This should be sufficient so long as you don’t need to keep your fire going all night or for a long period of time.
Large Fuel
If you have reached the point where you are using main fuel, you should also be able to use large fuel if you choose. This consists of thick logs. These are used to keep a fire going long term, like through the night. These are also good for a permanent camp where you plan to keep the fire going constantly. Larger fuel will allow for a fire to burn unattended for a much longer period of time.
Charred Cloth
Charred cloth is a small piece of black cloth also called charpaper. It is basically a slow-burning fuel of very low ignition temperature. It holds spark long enough to ignite tinder. This is useful if you want to use sparks to ignite tinder that isn’t very fine. A spark from something like a ferro rod can be caught by the charred cloth which will then ignite. This can be used to ignite the tinder.
To make charred cloth, heat cotton cloth until it turns black, don’t let it actually catch fire or burn. Save it in an airtight container until use.
Charred cloth doesn’t seem like the most practical thing to carry but it is another tool to be aware of. Personally, I would just substitute in cotton balls. A single cotton ball should probably be better than a single piece of char paper. To be fair though, a cotton ball will take up slightly more space. It is totally up to you but I would recommend cotton balls. They should be standard in your pack anyway. Also, not that charred cloth is expendable, kind of like matches. Each cloth is used only once. When you run out, that's it.
It is best to clear away snow and to avoid wet ground but you may not always have a choice. If you need to build a fire in the snow or on wet ground you can improve the situation a bit. It can help to first build a base of logs. You can then build your fire on top of this base. By the time it starts burning down through the base it will be well established and shouldn’t have too much trouble.
How to Build a Fire - Structure
When building a fire, it is important to be aware of the basic principles involved. If you understand these and build according to them you should do fine. With practice you won’t need to follow any strict structures so long as you follow the basic principles.
A fire needs solid fuel and air. Fuel needs to be packed close together but with enough space left that it will allow for airflow.
Everything needs to be dry. Always use dry wood / fuel.
Start with tinder on the bottom. Add the smallest possible pieces of wood on top of this. As these start to burn, start adding slightly larger pieces. Keep increasing the size very gradually as the fire is able to handle more. Being able to judge when the fire can handle more will be easier with experience. Build it up gradually. Continue doing this until the fire is well established and you are adding full sized logs.
There are many different structures that people use to arrange their fires. Let's review some of these here.
Tepee
I would view this as the default way to structure a fire. You can carefully arrange everything ahead of time or you can add the pieces as you go following the same pattern. The tinder goes in the center. The kindling is arranged in tepee shape around the tinder. You would leave an opening so that you can reach the center and light it. Arrange it with smaller sticks on the inside and larger sticks towards the outside. As it burns the sticks will fall inward.
Lean-to
A large stick is stuck in the ground at an angle. Kindling is leaned against this forming somewhat of a lean-to shape. This leaves a huge opening making it easy to reach the center. The opening should be facing away from the wind. The tinder is placed underneath towards the back.
Pyramid
In this configuration you would basically be building a tepee fire on top of your main fuel. The main fuel would be arranged in a pyramid shaped structure. This consists of alternating layers of parallel logs or branches. Each layer gets smaller and smaller. A starter fire (tinder and kindling) is build on top. The idea is that it will slowly burn downward.
Cross-ditch
Create two intersecting ditches. Build a kindling pyramid in the center. This allows for more airflow. The ditches allow air to flow under the pyramid.
Log cabin
In this configuration, you basically build a log cabin shaped structure out of your main fuel and build a tepee fire with kindling in the center. This is different from the pyramid because instead of being built on top, it is built in the center.
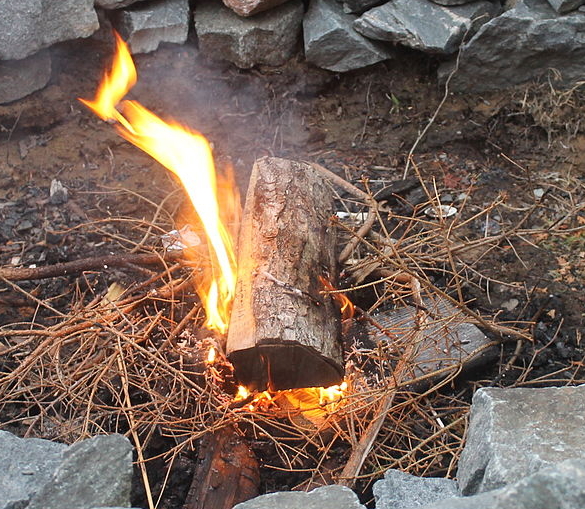
Star Fire
Slowly feed multiple, long logs into a fire. As they burn, keep pushing them in further.
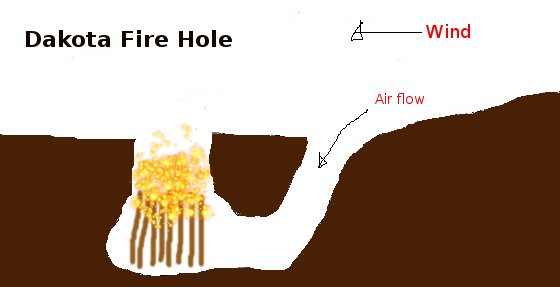
Dakota Fire Hole
This one is actually pretty neat when you actually see one built. The idea is that you build a fire inside a hole. You would have a second hole right next to the first with a diagonal tunnel feeding into the first hole. This tunnel provides ventilation for the fire. One of the advantages of this type of fire is that it is somewhat hidden. Much of it will remain underground. This makes it easier to keep a low profile. This is kind of the opposite effect that you would be going for with a signal fire. Besides having a low light signature, this method produces less smoke. It is also easier to light in windy conditions. It is efficient and burns strongly.
You really need to see the image to get a feel for how it is setup.
How to Start a Fire
Carry a couple different other fire starting tools. You should be familiar with as many of these methods as possible. Ideally, you should know every method. We would recommend carrying a few packs of storm matches, a lighter, and magnesium striker. It also doesn’t hurt to have tinder, a firestick, or paraffin wax.
Matches
This is the traditional modern way to start a fire. This is one of several firestarting tools that you should have with you. Keep them in a dry, airtight / waterproof container. If you don’t feel like reading each section just get the storm matches. A box of matches is expendable, so carry a lot. It is just one tool to have in your kit though.
Strike-anywhere matches can be lit on most rough surfaces. This makes it easier to find a striking surface making them somewhat more versatile. They are harder to acquire these days and can be difficult to find in the United States. Ordering online can be tricky. The USPS technically doesn’t even allow them to be shipped at all. They have been known to ignite during transit. If they ignite while you are carrying them, they won’t be of as much use. They also aren’t really necessary since you don’t really need to have something that you can strike anywhere. You will generally have the box with the matches and will probably always be able to use that to start them. It doesn’t hurt to be able to light anywhere but it isn’t as huge of a benefit as you might imagine. There are other match features that are important though.
Safety matches are different from strike anywhere matches. They require a separate striker to light. The striker is basically on the box of matches so this isn’t really so bad. It isn’t that big of a disadvantage when compared with strike anywhere matches. These are normal matches and are the easiest to find. They come as paper matches or stick matches. Really though, regular safety matches aren’t much better than strike-anywhere matches and you could argue that they are less good. There are special types of safety matches that are much better though. See the two types below.
Waterproof matches are a step up from safety matches. They provide a definite advantage over normal safety matches and strike-anywhere matches. These are good but still not the best.
Storm matches (lifeboat matches or flare matches) are coated with the combustible compound for about half the length of the stick. They are often longer than normal matches. They have a waterproof coating. This makes them a bit harder to light but is worth it. They burn well even in strong wind. They can sometimes even re-ignite after being dipped in water for a short time. Some are listed as being waterproof. This is what you want in your survival kit. You want to make sure that you have the least amount of trouble starting a fire even during heavy rain and wind. Note that you should still try to keep these dry. Keep them in a waterproof container.
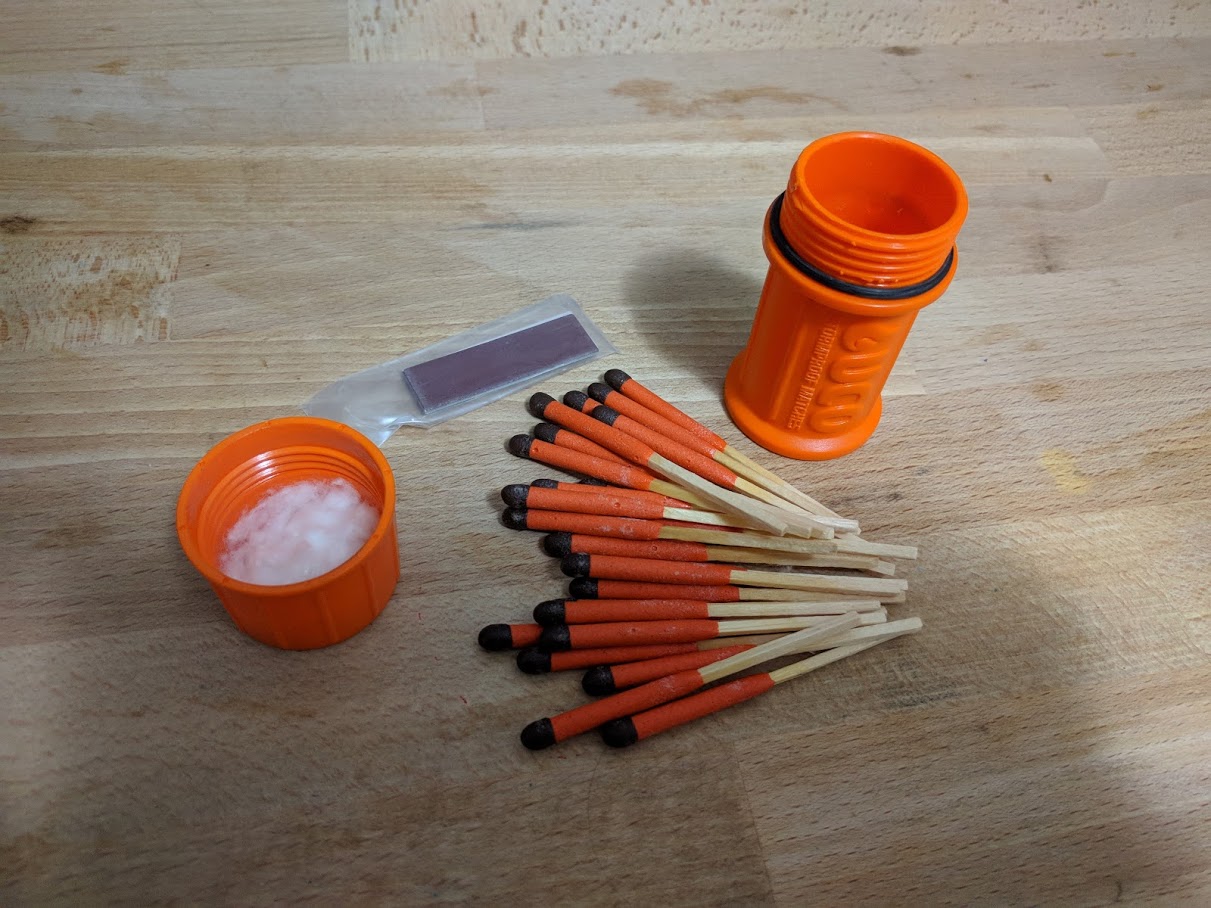
DIY - You can make your own waterproof matches by dripping wax on them. Just scrape it off before use. The storm matches are still better.
Lighter
When we say lighter, we mean just a cheap butane lighter. They cost almost nothing and you can buy them anywhere. You can also buy better, improved versions of the butane lighter which are OK too.
You can use a lighter over and over again. You can start hundreds of fires with a single lighter. It will run out eventually but it takes a long time. It is super easy to use and is much more practical than using matches in most cases. It isn’t always the best choice and you should still have both matches and a lighter.
Which is better, a lighter or matches? Doesn’t matter. Carry both.
Lighters do have disadvantages. They can break, they can get wet, and they may stop functioning in extreme cold. Keep in mind though that you should have backups. You should be carrying more than one lighter as well as a few packs of matches and a magnesium striker. If a lighter does become wet, it can be left to dry. If it is too cold to start, you can just keep it under your arm for a bit. You can also find varieties that are more resistant to the cold. It has been pointed out that they can be discharged in your pack. I haven’t come across this but you might want to keep that in mind and be careful.
You will want a cheap butane lighter. Don't go with a Zippo. While they can be convenient and provide a better flame for longer, Zippos run out of fuel quickly and can’t be depended on as much. They are still great to have but only in addition to a regular butane lighter, not as a replacement.
Magnifying glass
You can start a fire with a magnifying glass or other convex lense. This isn’t really the firestarting tool of choice as it will only work with sunlight. It won’t work at night or on a cloudy day.
It is worth being aware of this because it is a good emergency method for starting a fire if you don’t have anything else with you. This becomes practical when you consider that you can also use a lense taken from something else. You could use a lense from any of the following: binoculars, camera, telescopic sights, or an actual magnifying glass. So, if you are lost or stuck out in the wilderness without any fire starting tools, but you do have one of these things, you could potentially use them to start a fire.
People have also reported success starting a fire with the bottom of a soda can. It can be used as a parabolic dish to focus sunlight on a single point which can ignite tinder. For this to work, the bottom of the can needs to be polished. People have had luck polishing it with a chocolate bar and with tooth paste. You could probably find a lot of other things that would work to effectively polish the bottom of a can.
Battery - Multiple Methods
Supposedly, if you have two wires and a battery you can create enough of a spark to light tinder. This is probably going to be really hard but if this is all you have it is something to try. A liquid accelerant would make this much more effective.
There is another method involving a battery. You can use a 9v battery to ignite steel wool.
You can also start a fire with a AA battery and a gum wrapper. The gum wrapper needs to be partially made of metal. The idea is that you cut a thin strip of the wrapper and use it to connect the two ends of the battery. The wrapper should ignite.
Flint and steel
This is a very old method of building a fire. Flint is basically a rock that can be found in nature. A piece of flint is struck with a steel striker to produce sparks. These sparks are used to ignite carefully prepared tinder.
Ferro Rod
This is somewhat of a modern replacement for flint. Some people just casually refer to this as flint which is not accurate. It is made of a material called ferrocerium which is an alloy of iron and cerium. In practice the rods you buy may include iron, cerium, magnesium, and other ingredients.
Metal match
Sometimes people use the term “metal match” to refer to a ferro rod. This is not correct. There is actually a separate, distinct device called a metal match. It consists of a striker that ignites into an actual flame that stays lit instead of just producing sparks. We will review this in detail in a separate article.
Fire-plow
This method uses the friction between two pieces of wood to produce fire. A groove is cut along a large, flat piece of wood. A second piece of wood, shaped like a shaft ( a stick ) is pushed along the groove.
Hand Drill
This is another method based on friction. It uses two pieces of wood. One is a large, flat piece with a socket cut into it. The other is a shaft ( just a stick ). You would insert the shaft into the socket. The shaft is then rotated with the hands until the friction generates an ember. There will usually be a small notch on the side of the socket allowing the ember to be dumped out into a nest of tinder. This method is very difficult as it requires using one’s hands to directly turn the shaft. See the bow and drill method listed below for a more practical variation.
Bow and Drill
This is a variation of the hand drill method. This is a more practical and efficient way of doing almost the same thing. The difference is that instead of rotating the shaft with your hands, you would rotate it with a bow. A very simple bow is made with a cord and a stick. The cord could even be a shoelace. The cord is wrapped around the stick. As the bow is moved back and forth the shaft rotates. There is also usually an additional piece of wood with a socket placed on the opposite end of the shaft to hold it in place.
Transportation of Fire
If you are moving to a new campsite, you can carry embers from your old fire with you. Smoldering embers can be kept alive for days. This makes it much easier to start a fire wherever you are.
Large embers can be placed inside a big ball of dry moss. This would ideally be carried around in a metal can but could be placed in other containers so long as you are careful with it. You will occasionally need to blow gently on the embers to prevent them from burning out.
Tips and Shortcuts
- Use insect repellent on the tinder.
- Dry damp firewood near the fire before use.
- Bank the fire to keep coals overnight.
- Coals can remain hot a long time.
- Make sure that you fully extinguish a fire before leaving camp. Pay close attention to long burning embers hidden beneath the ashes.
- Some types of wood burn faster and some burn slower.
- Pine or evergreen sap is extra flammable. This can help a lot.
- Carry these to start a fire faster: cotton balls, dryer lint, fire sticks, paraffin wax.
- Cotton wool is way better than dryer lint. It is so cheap it may as well be free.
- Gun powder can be taken from bullets to help start a fire ( dangerous ).
- A fire can use up all of the oxygen in an enclosed shelter.
- Fires can get out of control. Make sure that you clear a safe area before building a fire.
- Don’t build a fire larger than you can control.
- Watch out for overhanging tree branches.
- WARNING - Bamboo may explode when heated. To avoid this, make sure break or cut it open first.
More
There is actually a Wikipedia page about fire building: